Tuesday, November 28, 2017

No scrap is safe!

     I have always loved the Scrappy Trips from Bonnie Hunter, a free pattern on her blog. I combed (ransacked) through all my strip bins for 18" x 2.5" strips. Six are needed per block and I need 30 blocks. I did not cut up WOF 2.5" strips, but used partial ones and I had to process more scraps that are in bags under my longarm just waiting to be liberated. This quilt certainly chews through lots of fabric scraps.
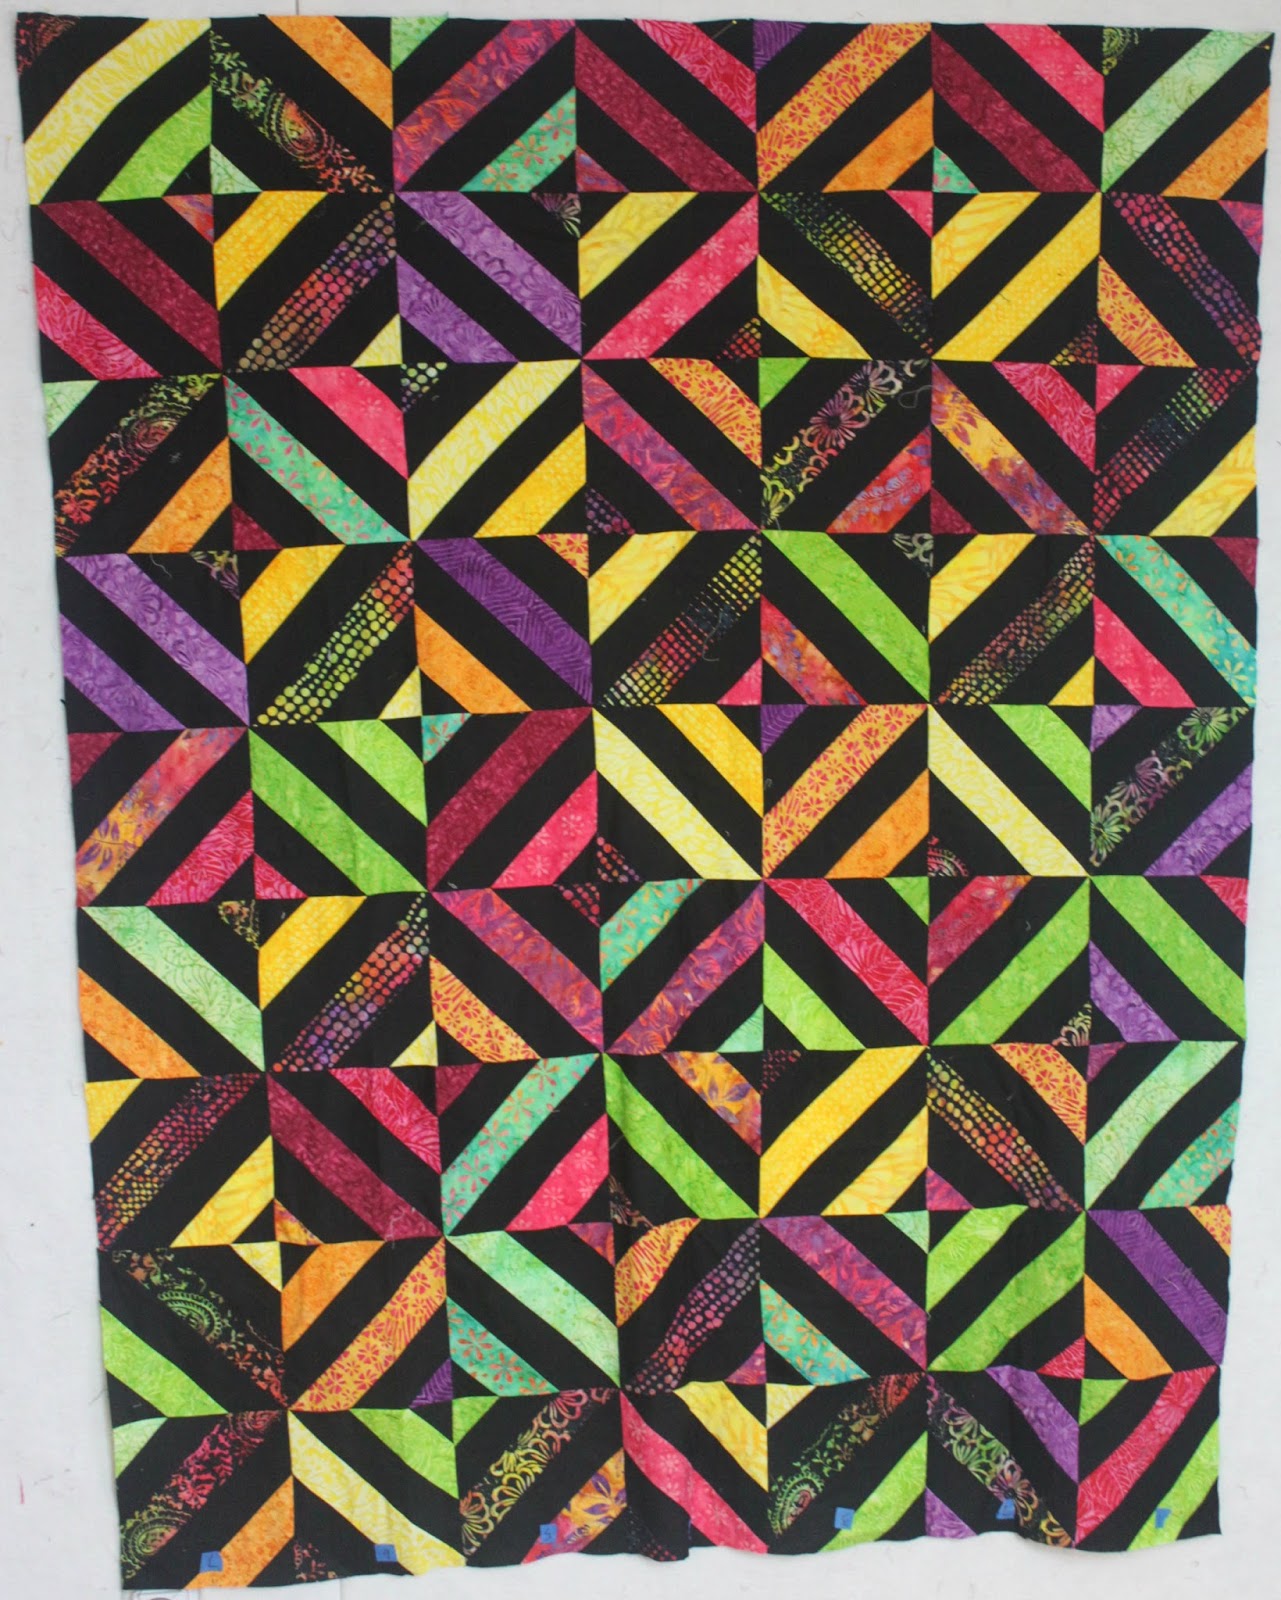
     I arranged the 6 strips and pinned them at the top in order of left to right. I made 2 extra sets (things happen). I stacked them in a plastic bin for safety from the cat, who likes to ransack strips. Finally, I was able to make 2 blocks to see how it looks. Only a bit of ripping, ironing seam direction is real important.


Trimming up, stacking up, go!

     When I first started quilting, I did not know (care) about trimming blocks when putting them together. The patterns I used did not mention it. However, after wrestling fabric into a top and losing, I started trimming. For HSTs, the Bloc Locs were wonderful. For squares, the Stripology Ruler makes it work. I am on the last round for another exploding squares quilt. I started with 4" squares. The last squares is 8".  I trimmed every sewn square before I put on another square. 
     My mom can sew the 4 edges, but I cut them open and trim and layer. I use washable Elmers glue in the 4 corners to hold the layers so there are no pins and so my speed demon mother cannot get them out of whack in the corners (I keep saying they are FEED dogs, not PUSH dogs to no avail).
     Anyways, I gave her the last round on Thanksgiving and you can see the slight slivers of fabric left which make a huge difference when I sew the blocks together (will need another last trim).


Wednesday, November 22, 2017

Some finishes

     I completed my Christmas present pillowcases at the retreat and this week made significant progress on Sapphire Stars. I have to put a 2.5" navy border around the body and then attach the piano keys that are already sewn. I made some changes to the pattern so the piano keys attach to all sides instead of an awkward navy blue rectangle at the corners. You will see what I mean later.


Tuesday, November 21, 2017

Always keep learning

     Our guild sponsored a 2 days of classes with Karen Kay Buckley,  http://www.karenkaybuckley.com/index.php. We split her time with other guilds so we could split her expenses. The two other guilds had lectures and classes. I am not much into applique, mostly because my hand sewing is, um, lacking skill and I hate fusibles. Karen does not use fusible. She taught a machine applique class, Kansas Rose, and a hand one, Modern Dahlia. If you ever get a chance to see her, she is an excellent, superb, teacher. I did not finish either project and I will finish the hand one by machine.
   She taught us by using a heat resistant plastic called Templar and Magic Sizing painted on the seam allowance, to turn under the edges so the piece can be sewn on. In the machine applique class, we used clear YLI thread and a blindstitch at 8 stitch bites per inch to secure and I think it looks great. I laughed and laughed at the size of the needle and eye. In my wildest dreams, I don't think I could hand sew an entire block at 8 hand stitches an inch with this needle. 
   I have some other projects to finish before I get to these.
Leaves, stems and flower machine appliqued down with YLI clear

Ha, ha, tiny needle. My attempt at hand applique.

Both projects in process with fabric selection. I have excellent directions from Karen to finish.

Wednesday, November 15, 2017

Work, work, work retreat

     Our guild has two retreats per year from Thursday to Sunday. Last weekend was one and I spent a lot of time packing quilts that just needed assembly. I also cut 8 pillowcases and sewed all. I had a little project I called Phony Dresdens for the participants, another woman did hanger covers out of fleece and another did zipper pouches. So, lots to do. Someone cooks the food and cleans it up. It is of cafeteria quality, but I am not there to eat. There is always our snack table...
     I have been having issues getting photos off my camera card in the laptop. I have to keep taking it in and out many times before it registers- doesn't matter the camera card. I also miss Picmonkey since it went the pay monthly route and have been using Pixlr which does not have a white balance. I need to find a good editor with just the basics. So, doing the blog has become frustration. I was not able to get the pillowcases or projects off, so another time.
    First, the exploding squares. One quilt started with 6" center squares, the other with 4". When I got the 6" one home on the wall, I thought it needed a border and put one on. I think the 4" one may need another row although I have no more right now.
4" center square start
6" center square start
With 3" cut border

     I had some leftover squares from a MSQC pattern, Disappearing Hour glass, so I added some sashing and a border for another comfort quilt. I brought border fabric which did not work, but a visiting quilt store brought some yardage with a demo and I found the right one.

     The diagonal variations also was sewn and I decided to stay stitch 1/8" around the perimeter to help it stay truer when I put it on the long arm. Hope it helps.


     Alas, I could not assemble Sapphire Stars because I was short two blocks with yellow triangles. I know I made enough as I recounted them, but nowhere to be found. I made the two blocks last night and sewed the large large block so I can start sewing on the sashing.

Thursday, November 9, 2017

Wild diagonals

     I have made this pattern before, but this time I used a black jelly roll I got on sale a while ago and a batik strip jelly roll sitting around. It is Diagonal Variations that I found at jellyrollfabrics.net.
My mom sewed the long strips- two sets- black color black, and color black color and then into a tube (sewn on the sides of the sets). I cut them into triangles that open up into squares. They sat for a while because I trimmed the last squares 1/4" smaller than the rest of them and could not make the decision to either make the quilt smaller or trim all the other squares. Finally, I trimmed them all and laid it out. It looks a bit wild.
    For the next 4 days I will be at a quilt retreat and hope to get this sewn together as well as other tops. They feed us, we sew and sleep- what is not to like about that?

All the trims

Friday, November 3, 2017

Mired in odd and ends

     I feel like I am slogging in slow motion. I am attempting to finish a whole bunch of languishing projects. I finished sewing our guild's mystery quilt and so the top is done. The reveal is not until January, so I am only showing the center block on the off chance someone from the guild looks at my blog. I am trying to cut and kit together about 9 other projects to take to our guild retreat next week so I all I will have to do is sew a lot of these UFOs together. So, math is involved and scrounging fabric and wondering what the heck I was doing the last time I worked on it. 

      Someone from the guild asked me to quilt her veterans quilt for our deadline on Monday. I sort of forced it in and for the life of me, I can not just quilt long lines all over. I chalk them in, and just can't do it- I have to add other things in each area. I used Military Gold glide. I did not trim it as she was going to trim and bind it. Hard to quilt someone else's quilt.

Detail
Sorry, not enough light to take a good photo of the back
Detail
Detail